How to Use Your Server Dashboard
Table of Contents
Everything you do to a running game server happens in one place: start and stop it, send it commands, change its settings, back it up and put it on a timetable. This guide walks through the server dashboard tab by tab, using a Terraria server as the example, and the steps are the same whichever game you host. Setting up a brand new server is covered in each game's own setup guide, such as Terraria: How to Set Up a Server.
Before You Start
- An active server. Every step below works on a server you already own.
- Any game, any plan. The dashboard is part of the panel, not part of a game. What differs between games is the list of settings on the Startup tab and the ports listed on the Advanced tab.
- A server that has finished installing. While a new or reinstalled server sets up, the panel shows Your server is installing. Some tabs unlock automatically when setup finishes. and every tab except Console and Advanced stays locked until it is done.
- Restore and Reinstall overwrite files. Both are covered below. Make a backup first (Step 7) if there is anything on the server you want to keep.
Step 1: Open Your Server From the Dashboard
Sign in and open your HardGaming dashboard. Each server you own has a card under My Servers showing its status, uptime, RAM and disk use, with STOP and RESTART buttons for quick power changes. Click MANAGE SERVER to open the full panel.
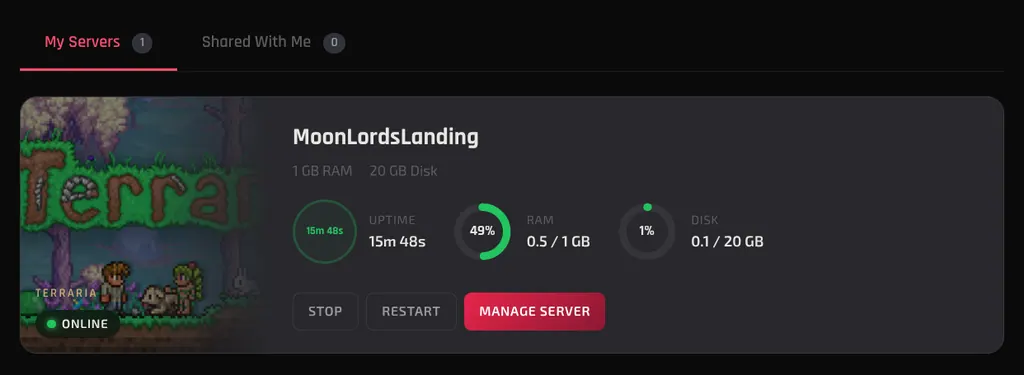
Servers a friend has shared with you appear under Shared With Me, next to My Servers.
Step 2: Start, Stop or Restart the Server
The Console tab opens first. Use START, RESTART and STOP at the top of the console. Only the buttons that make sense right now are clickable: a stopped server offers START, a running one offers RESTART and STOP.
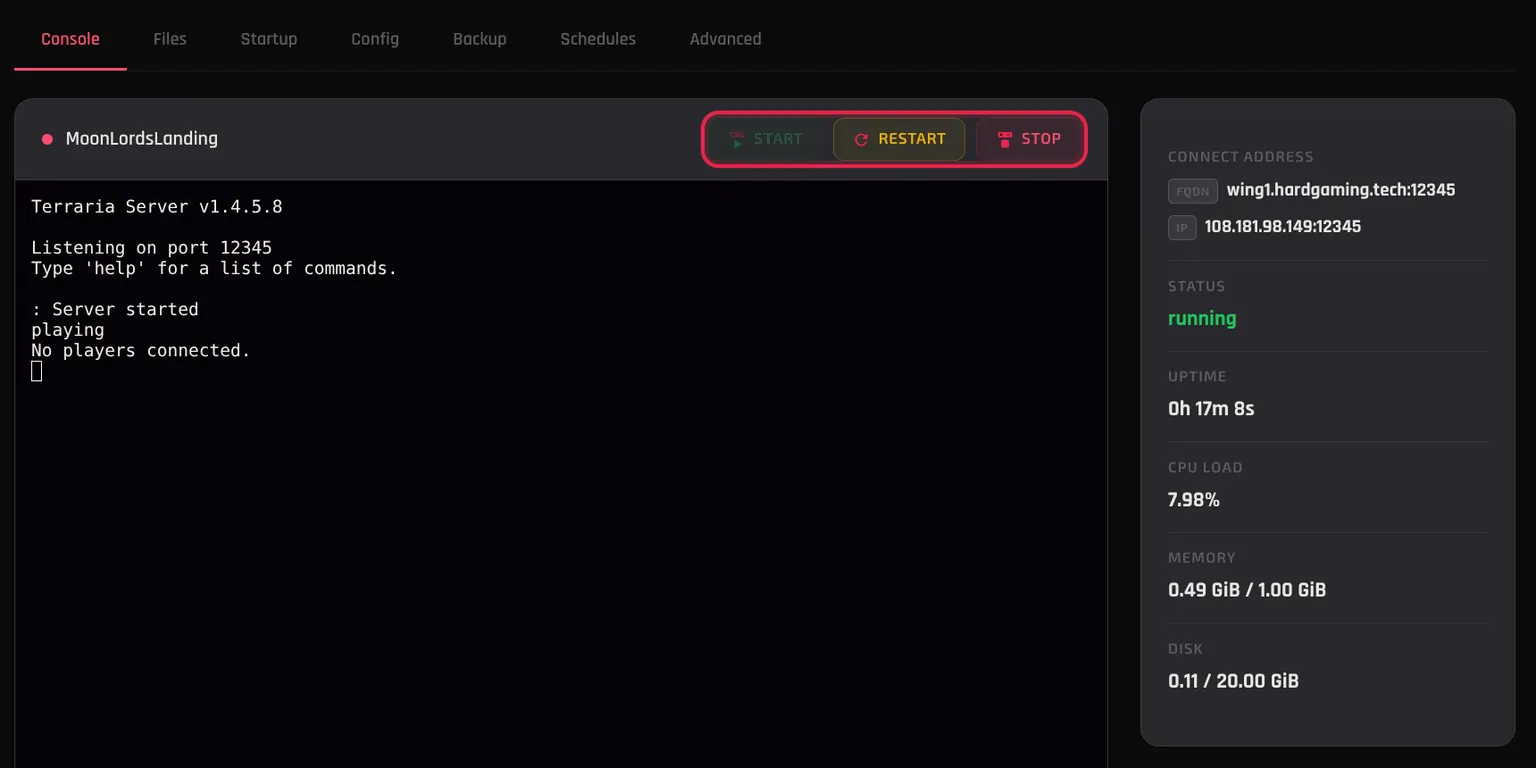
The panel on the right is your server at a glance:
- CONNECT ADDRESS is what players type to join, shown as a name under FQDN and as a number under IP.
- STATUS moves from
offlinetostartingtorunning. A Terraria server reachesrunningin about ten seconds. - UPTIME and CPU LOAD show how long it has run and how hard it is working. MEMORY and DISK show use against your plan's limits.
RESTART asks for no confirmation, so the server goes down as soon as you click it.
Step 3: Send a Command From the Console
Click the Type a command... box under the console, type a command your game's server understands, and press Enter. The command and the server's reply both appear in the console, and the box clears for the next one.
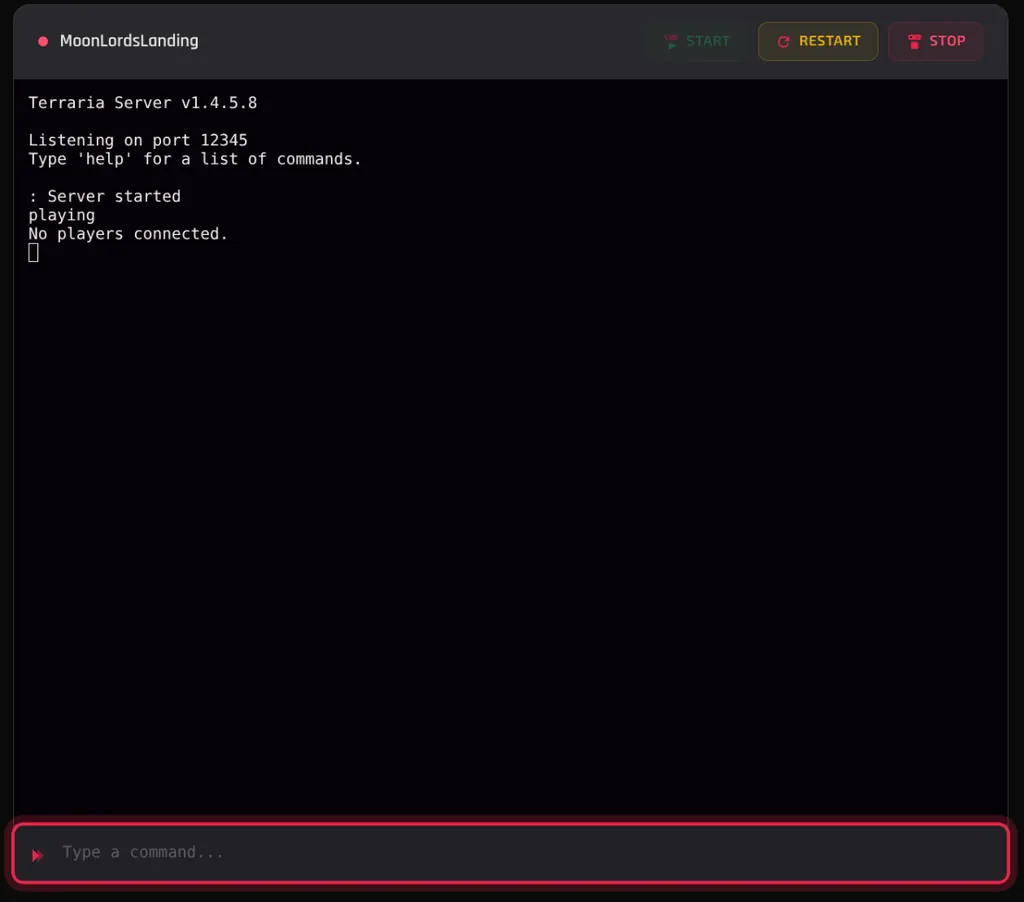
Which commands exist depends on the game. On Terraria, playing lists who is online and help lists everything else.
Step 4: Change a Setting on the Startup Tab
The Startup tab holds your game's main settings as a form: world name, player limit, difficulty, password and so on. Change a field and it saves on its own, with the message Variable saved. A running server keeps its current value until it restarts.
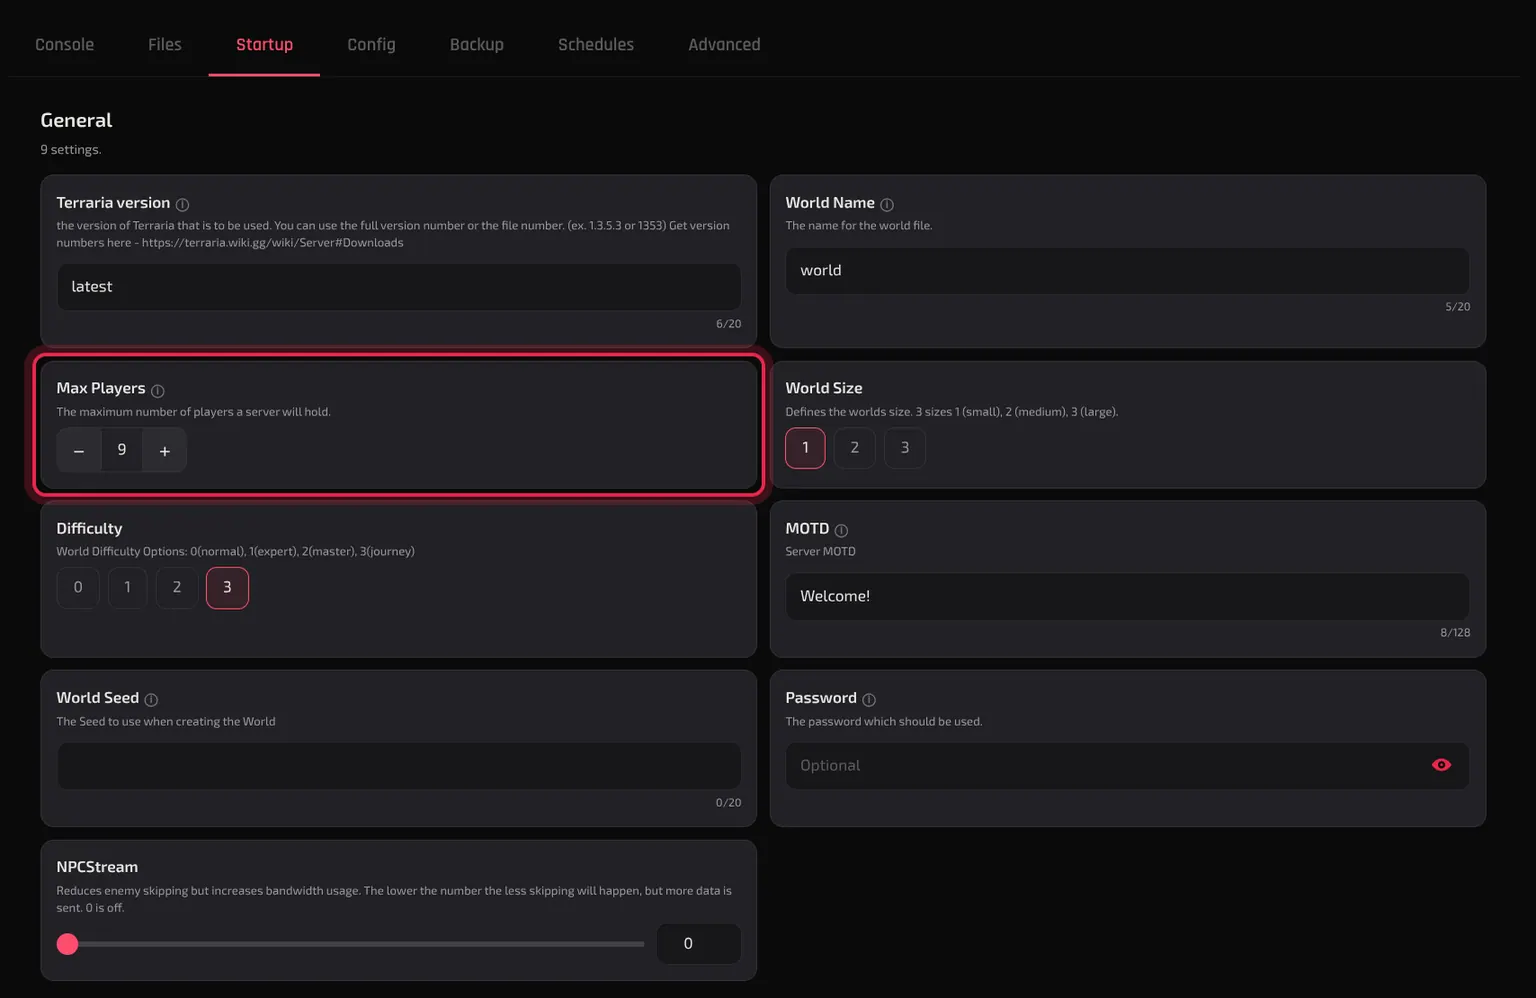
Click RESTART on the Console tab to put the new value to work. Use this tab for any setting it lists, rather than editing the same setting in a file. See Startup Settings and Config Files for why.
Step 5: Add a Config File to the Config Tab
The Config tab is where you edit a game's settings files safely. On some games it is there from the start, with the game's settings files already listed. On others there is no Config tab until you add a file to it, which is what this step does. If the file you want is already listed, skip to Step 6.
Open the Files tab, click the three dots at the end of the file's row, and choose Add to Config tab. The panel confirms with Added to the Config tab and the file's path. If the server had no Config tab yet, one appears between Startup and Backup.
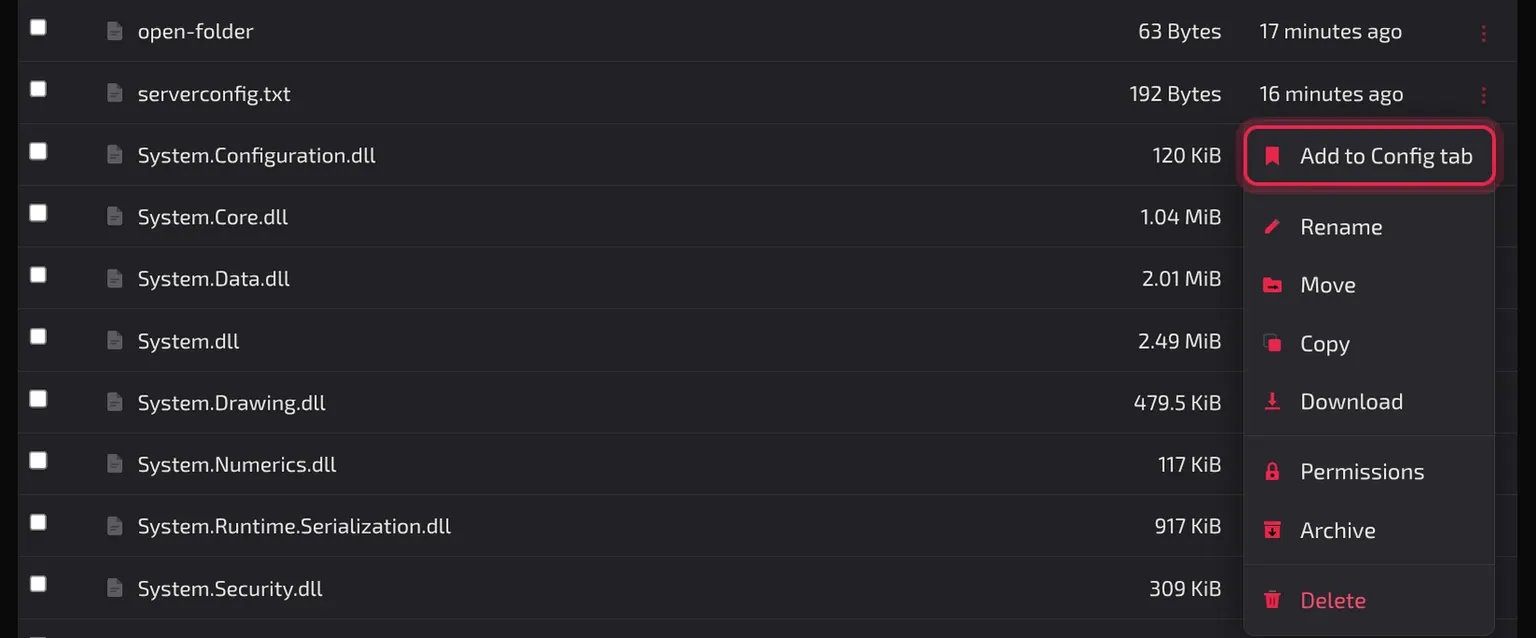
The file stays on the Config tab after a restart or a reinstall. To take it off again, click the minus sign beside its name on the Config tab, labelled Remove from Config tab.
Step 6: Edit and Apply a Config File
On the Config tab, click the file under CONFIG FILES to open it, make your change, and click Save Draft. The file is marked DRAFT and the button at the top becomes Apply Changes with a count of the files waiting.
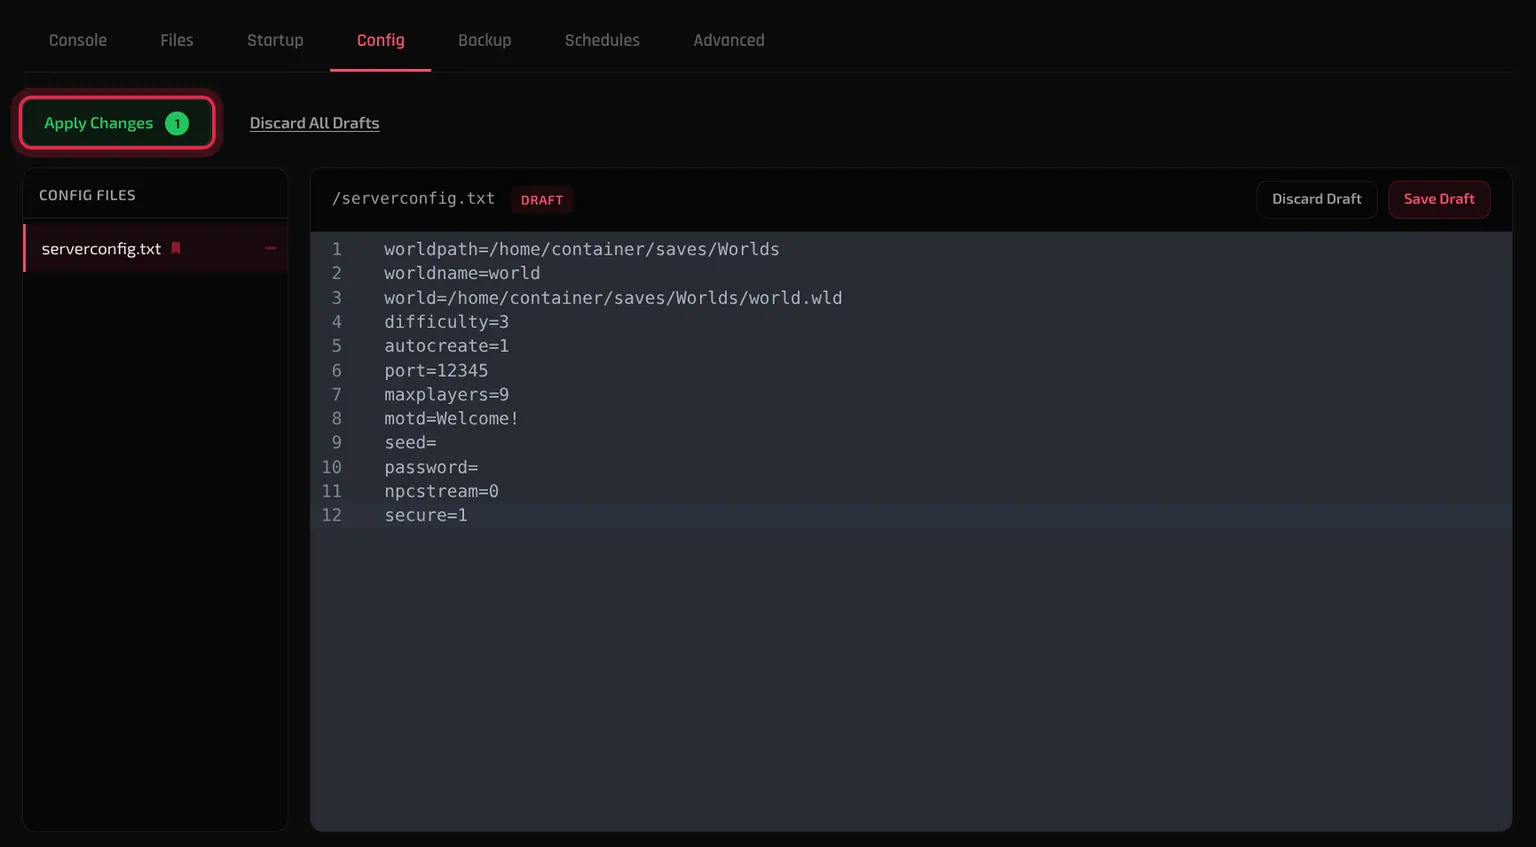
Click Apply Changes, then Stop & Apply. The panel shuts the server down, writes the file, and starts it again, then reports Config changes applied successfully. Server is restarting.
Changed your mind before applying? Discard Draft puts one file back as it was and confirms with Draft discarded for the file's name. Discard All Drafts does the same for every waiting file and confirms with All config drafts cleared. Neither asks first.
Step 7: Create a Backup
Open the Backup tab and click Create Backup. Type a name into Backup Name and click Okay. The backup appears in the list within a few seconds, with its size and age.
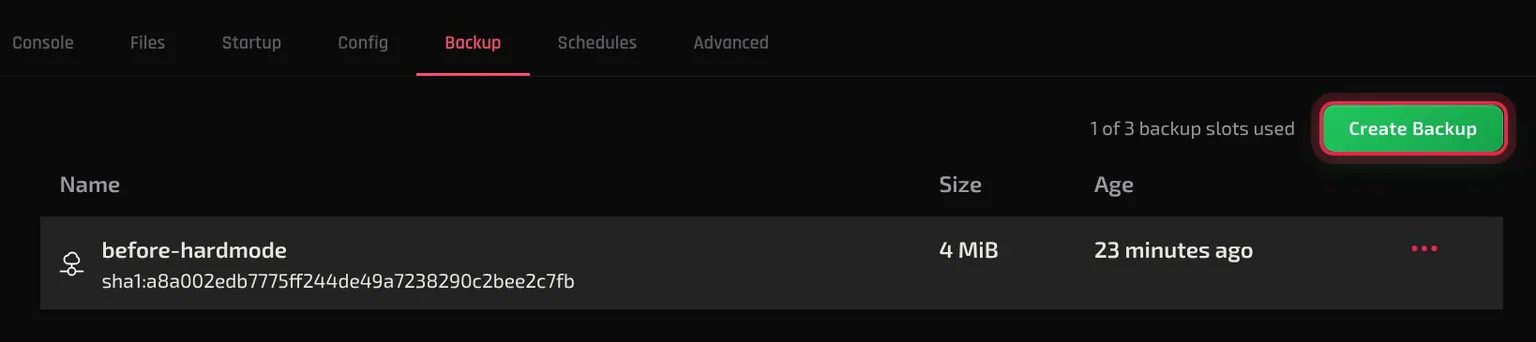
Every server starts with three backup slots, counted above the list, and you can add more from Billing. Locking, restoring and what happens when the slots fill up are covered in How to Back Up and Restore Your Server. The three dots on a backup's row give you Download, Restore, Lock, Delete and Deep Save.
When all three slots are full, what happens depends on how the backup is made:
- Create Backup refuses with Cannot create a new backup, this server has reached its limit of 3 backups. Delete an old one first.
- A scheduled backup (Step 8) deletes the oldest unlocked backup to make room, without asking.
Lock, in the same menu, keeps a backup out of that clear-out. The panel describes it as preventing the backup from being deleted until explicitly unlocked, and the menu then offers Unlock in its place.
Restore stops the server and puts the backup's files back. When it finishes, the server stays offline until you click START. To keep a copy that survives even if the server is deleted, follow DeepSave: Keep a Backup After Server Deletion, and to bring one back, DeepSave: Restore a Save or Rebuild a Server.
Step 8: Schedule an Automatic Task
Open the Schedules tab and click Create schedule. Give it a name, set Minute, Hour, Day of Month, Month and Day of Week, then switch on Schedule Enabled and click Create Schedule.
Note: Schedule Enabled starts switched off. A schedule saved without it never runs on its own.
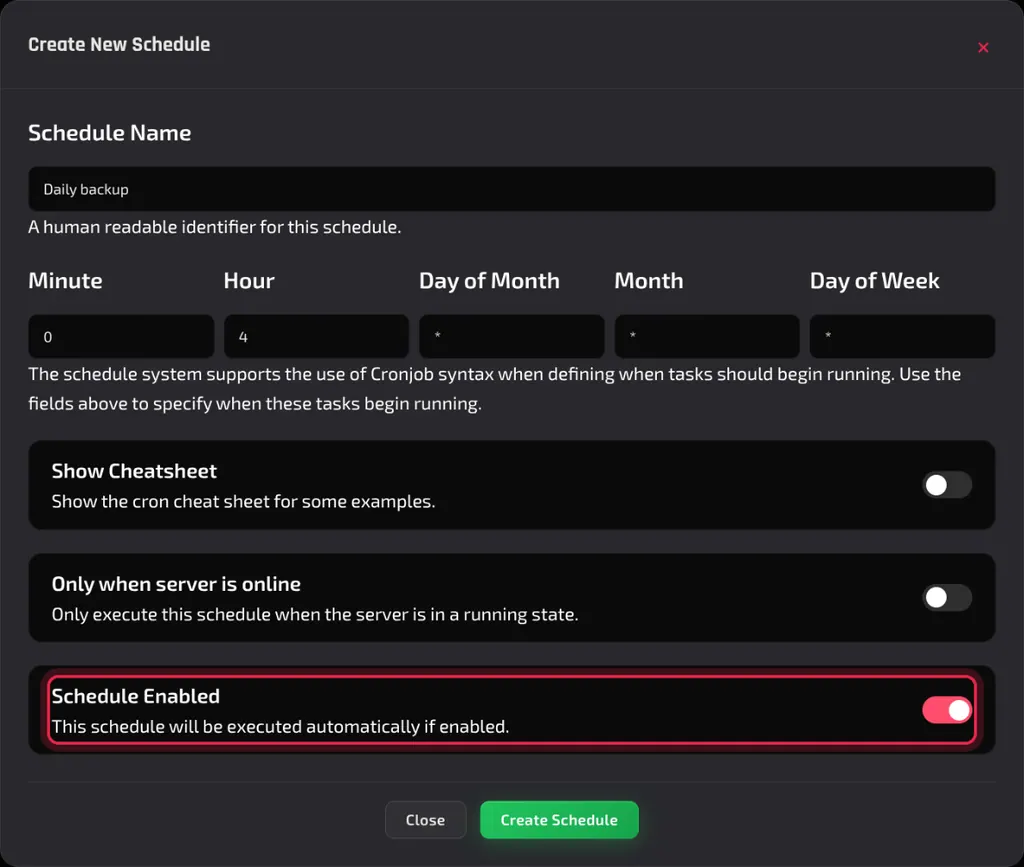
The time fields use cron format, where * means every. Minute 0 and Hour 4, with the rest left as *, runs at 4:00 AM every day. Schedules run on US Central time, so convert from your own time zone before you set the hour. A full walkthrough, including warning players before a restart, is in How to Schedule Restarts and Backups.
A schedule does nothing until it has a task. Click the schedule in the list, then New Task, and choose an Action:
- Send Command sends a console command, typed into Payload.
- Send Power Action starts, restarts, stops or terminates the server.
- Create Backup takes a backup.
Click Run Now on a schedule to run its tasks straight away and check they do what you expect. Only when server is online does what its label says: Only execute this schedule when the server is in a running state. Leave it off for a restart task, because a restart task also starts a stopped server.
What Does Each Tab Do?
Each tab handles one job, and this is the short version of all of them.
| Tab | What it is for |
|---|---|
| Console | Power buttons, live output, commands, and the connect address |
| Files | Browse and upload the server's files, and rename, move, copy, download or delete them |
| Startup | Your game's main settings, saved as you change them |
| Config | Settings files, either listed for you or added from Files, edited with drafts and applied in one step |
| Backup | Up to three backups, plus restoring a DeepSave |
| Schedules | Timed commands, restarts and backups |
| Advanced | Sharing, reinstalling, SFTP access and the server's ports |
Play Mini Games, above the tabs, opens a handful of browser games.
Startup Settings and Config Files
Many settings appear in two places: as a field on the Startup tab, and as a line in a file on the Config tab. The Startup tab wins. Every time the server starts, it takes the Startup value over whatever the file says.
On a Terraria server, changing motd= in serverconfig.txt and restarting brings back the MOTD value from the Startup tab. A line that has no Startup field, such as secure=1, stays exactly as you wrote it.
So the rule is:
- The setting is on the Startup tab: change it there.
- It is only in a file: add the file to the Config tab and edit it there.
Advanced Tab Tools
Server Sharing
Type a friend's HardGaming username under Server Sharing and click Share. The panel confirms with Server Shared Successfully and describes what they get: They can view the console, monitor resources, control power, and create and download backups.
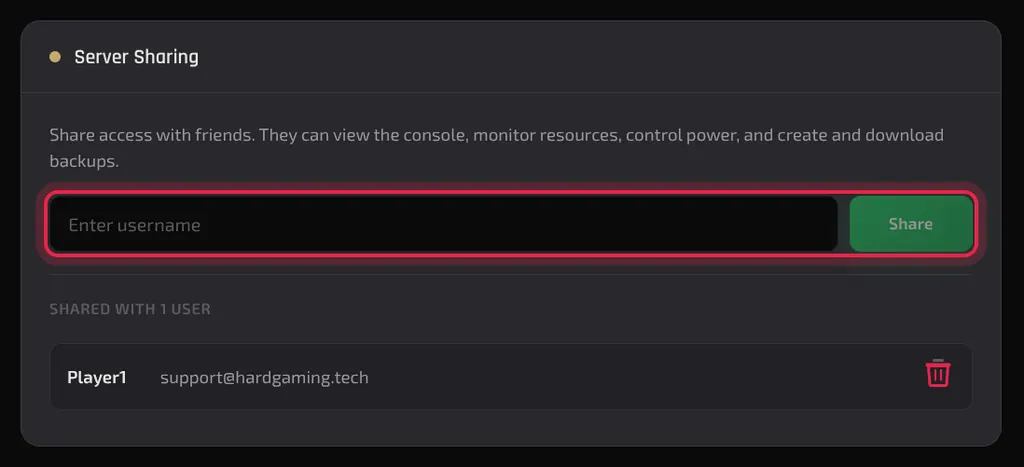
Your friend finds the server under Shared With Me on their own dashboard. Their panel has only the Console and Backup tabs: they can start, restart and stop the server and send commands, and the only option on a backup is Download. Settings, files, schedules and this Advanced tab stay with you.
To take access away, click the bin icon on their row under SHARED WITH.
A username that does not exist returns User not found with the provided username. Please try with a valid username. The full walkthrough, including what your friend sees, is in How to Share Your Server With a Friend.
SFTP Access
Click Enable SFTP to connect to your server's files from an SFTP program such as FileZilla or WinSCP. The panel then shows a Connection URL, a Username and a Password, each with a copy button, and the password is hidden until you click to reveal it. Disable SFTP turns access off again. The full walkthrough, from enabling it to uploading with FileZilla, is in How to Upload Files to Your Server.
Reinstall Server
Reinstall Server runs your game's install again. It overwrites the files the install put in place, including any edits you made to them, and keeps files it does not write, such as your worlds. On a Terraria server, a reinstall reset serverconfig.txt to its defaults while the world, the backups and the schedules all stayed. The server is offline afterwards until you click START.
Warning: Reinstalling cannot be undone. Create a backup first.
Port Allocations
Port Allocations lists the ports assigned to your server. A Terraria server has a single GAME PORT; other games list more, such as a query port.
Troubleshooting
Config file edit undone after a restart?
- The setting also has a field on the Startup tab, and that value wins every time the server starts. Change it on Startup instead. See Startup Settings and Config Files, or the full fix in Server Settings Reset After a Restart.
Server stays offline after a restore or reinstall?
- Both leave the server stopped on purpose. Open the Console tab and click START.
Schedule never ran?
- Open Edit on the schedule and check Schedule Enabled is on. It starts switched off.
- Check the hour against US Central time, not your own.
- Click the schedule and confirm at least one task is listed under it.
- If Only when server is online is on, the schedule skips any time the server is stopped.
No Config tab?
- Some games list their settings files there from the start. On the rest, the tab appears once you add a file to it. Follow Step 5.
An old backup disappeared?
- A scheduled backup with all three slots full deletes the oldest unlocked backup. Lock any backup you want to keep from the three dots on its row.
Backup says Rate limited?
- Creating several backups close together returns Rate limited. Retry after a number of seconds. Wait that long and try again.
Best Practices
- Stop the server before editing a file on the Files tab. Some games write their settings back to disk while running or as they shut down, which can overwrite your edit. The Config tab's Stop & Apply does this for you, so prefer it.
- Back up before anything that overwrites files. That means Restore, Reinstall Server, and large config changes.
- Lock backups you care about, especially on a server with a backup schedule. A locked backup is never the one a schedule clears to make room.
- Leave Auto Update on where your game's Startup tab offers it, so the server keeps pace with game clients.
Next Steps
- Keep a backup after server deletion with DeepSave
- Restore a DeepSave or rebuild a deleted server
- Schedule restarts and backups
- Upload a world, mod or config file to your server
- Fix settings that reset after a restart
Looking for your next world? Browse every game we host and spin up a server in minutes.
Need Help?
If you run into any issues, the HardGaming support team is here for you:
- Forum: ask the community and search past answers
- Email: support@hardgaming.tech
- Live Chat: use the chat widget on hardgaming.tech
- Discord: join our community for quick help
Happy gaming! 🎮