How to Back Up and Restore Your Server
Table of Contents
A backup is a saved copy of your server's files that you can roll back to after a bad update, a broken config or a world you would rather forget. You can back up and restore your server from the Backup tab in a few clicks, and locking the backups that matter keeps them safe from automatic clean-up. Keeping a copy that outlives the server itself is a separate feature, DeepSave, covered in DeepSave: Keep a Backup After Server Deletion.
Before You Start
- An active server. Backups belong to a server you already own.
- Any game, any plan. Backups work the same way on every game we host. The examples here come from a Terraria server like the one in Terraria: How to Set Up a Server.
- Three backup slots. Every server can hold three backups at once. You can add more slots from Billing (see Backup Slots and Upgrading).
- Restoring stops the server. While a restore runs you cannot use the power buttons, open the file manager or create another backup. The server stays offline afterwards until you start it.
Step 1: Open the Backup Tab
Sign in to your HardGaming dashboard and click MANAGE SERVER on your server's card. In the row of tabs, click Backup.
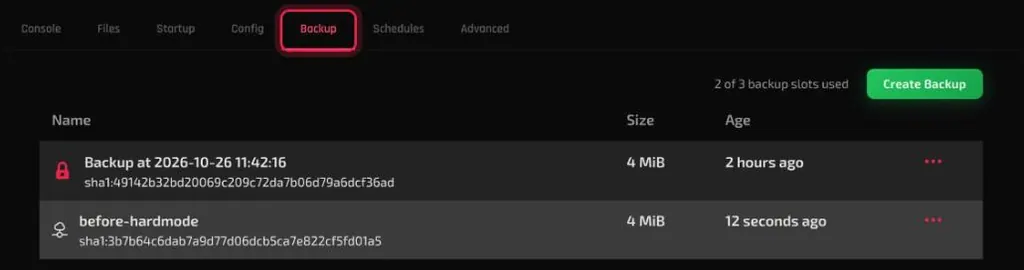
The tab counts your slots above the list, for example 2 of 3 backup slots used. Each backup shows its size, how long ago it was made, and three dots that open its menu.
Step 2: Create a Backup
Click Create Backup. In the Create Server Backup dialog, type a name into Backup Name and click Okay.
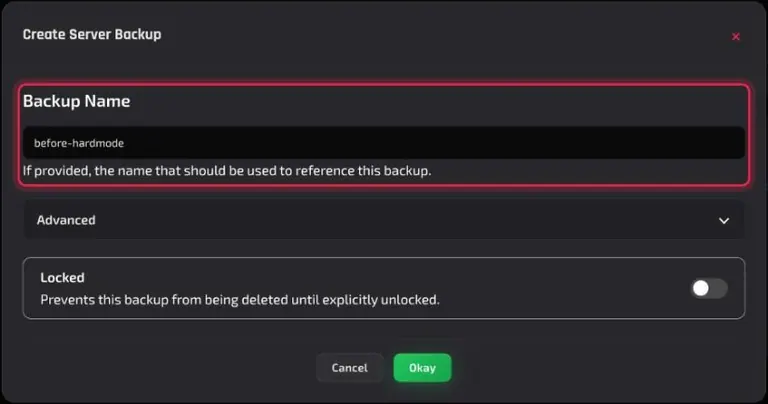
The backup appears in the list within a few seconds. Pick a name that tells you later what the backup was for, such as before-hardmode.
Two more options sit in the same dialog:
- Locked protects the new backup straight away. The dialog describes it as: Prevents this backup from being deleted until explicitly unlocked.
- Advanced opens Ignored files / directories, where you list files or folders to leave out of this backup. Left blank, the panel uses the
.pteroignorefile in the root of your server's folder, if there is one.
Note: The name is required, even though the field's hint calls it optional. Leaving Backup Name empty returns Backup Name is required.
Step 3: Lock the Backups You Want to Keep
Click the three dots on a backup's row and choose Lock.
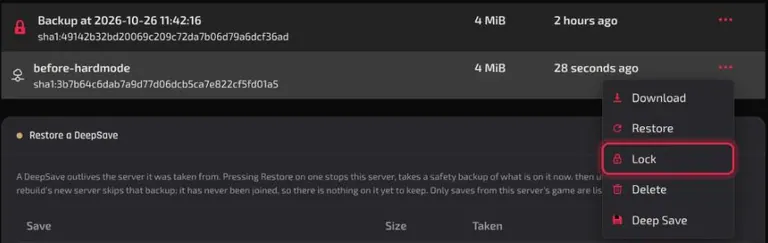
No message appears. Instead, a red padlock icon shows on the backup's row, and the menu offers Unlock in place of Lock. A locked backup cannot be deleted, by you or by a backup schedule, until you unlock it.
Deep Save, in the same menu, is covered in the DeepSave guide.
Step 4: Restore a Backup
Click the three dots on the backup you want to roll back to and choose Restore. The dialog warns: Your server will be stopped. You will not be able to control the power state, access the file manager, or create additional backups until completed. Click Okay.
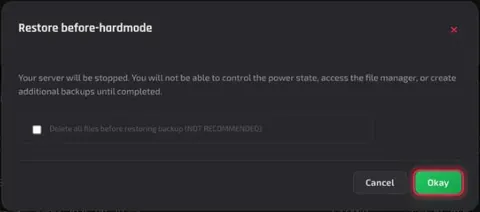
The panel confirms with Restore started successfully.
Leave Delete all files before restoring backup (NOT RECOMMENDED). unticked. The panel itself marks it as not recommended.
Warning: A restore rolls your server back to the backup. If the current state is worth keeping, create a backup of it first (Step 2).
Step 5: Start the Server After a Restore
Open the Console tab. When the restore is done, the console prints Completed server restoration from local backup. and STATUS still reads offline. Click START.
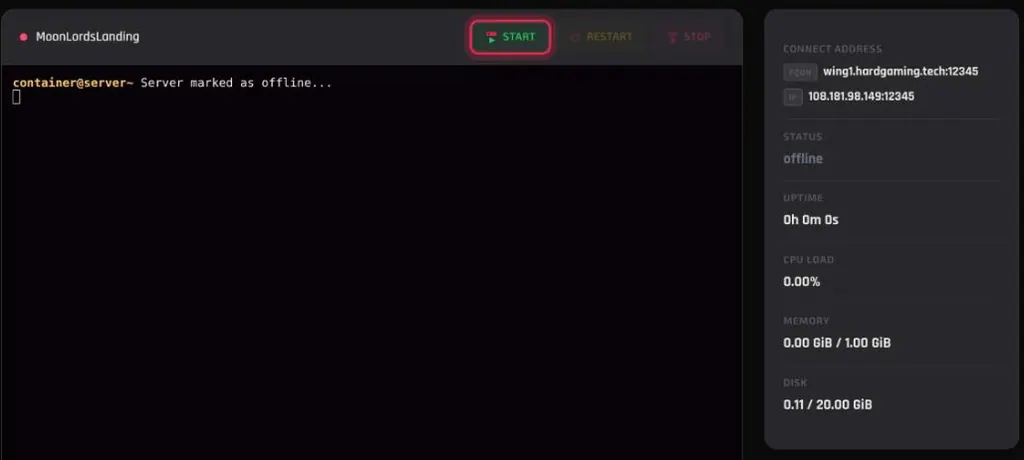
STATUS then moves from offline to starting to running, which takes about ten seconds on a Terraria server.
Step 6: Delete a Backup You No Longer Need
Click the three dots on the backup and choose Delete. The dialog warns: This is a permanent operation. and that the backup cannot be recovered once deleted. Click Delete Backup.
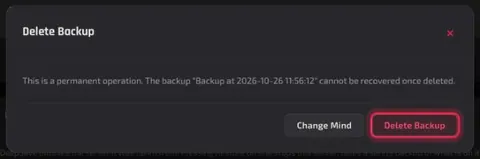
The panel confirms with Backup deleted successfully and the backup leaves the list. Clicked Delete by mistake? Change Mind closes the dialog and keeps the backup.
A locked backup opens the same dialog, but confirming returns Cannot delete a backup that is marked as locked. and the backup stays. Choose Unlock from its menu first.
Backup Slots and Upgrading
Every server includes three backup slots at no extra cost. The count above the list shows how many you have used, such as 2 of 3 backup slots used.
To keep more, open Billing, click UPGRADE on the server, and add Backup Slots. They come in blocks of three, and the count on the Backup tab rises to match. How to Manage Billing and Cancel a Server walks through the upgrade.
Each server also has one DeepSave slot, separate from these three. A DeepSave survives even if the server is deleted. See DeepSave: Keep a Backup After Server Deletion to make one and DeepSave: Restore a Save or Rebuild a Server to bring one back.
Backups are also rate limited. Creating several close together returns Rate limited. Retry after a number of seconds, and the number counts down until you can try again.
What Happens When Backup Slots Are Full?
It depends on how the backup is made. Create Backup refuses, and a scheduled backup makes room by deleting your oldest unlocked backup.
- Create Backup returns Cannot create a new backup, this server has reached its limit of 3 backups. Nothing is deleted. Remove an old backup (Step 6) and try again.
- A scheduled backup, made by a schedule task with the action Create Backup, deletes the oldest unlocked backup without asking and takes its place. Locked backups are skipped, so if the oldest one is locked, the next-oldest unlocked backup goes instead.
That is why locking matters on any server with a backup schedule. How to Schedule Restarts and Backups covers setting one up.
Troubleshooting
An old backup disappeared?
- A scheduled backup with every slot full deletes the oldest unlocked backup. Lock the backups you want to keep from the three dots on their row (Step 3).
Server still offline after a restore?
- A restore always leaves the server stopped. Wait for Completed server restoration from local backup. in the console, then click START on the Console tab (Step 5).
Can't create a backup?
- Cannot create a new backup, this server has reached its limit of 3 backups. means every slot is used. Delete a backup you no longer need (Step 6), or add slots from Billing.
- Backup Name is required. means the name field was empty. Type a name and click Okay again.
- Rate limited. Retry after a number of seconds means backups were made too close together. Wait until the countdown ends.
Can't delete a backup?
- Cannot delete a backup that is marked as locked. means the backup is locked. Choose Unlock from its three-dot menu, then delete it.
Best Practices
- Back up before anything that overwrites files. That means restoring an older backup, running Reinstall Server on the Advanced tab, and making large config changes. Reinstalling keeps your existing backups, so the one you made beforehand is still there afterwards.
- Lock the backups you care about, especially on a server with a backup schedule. A locked backup is never the one a schedule deletes to make room.
- Name backups for what they protect.
before-hardmodetells you more in three weeks than a date does.
Next Steps
- Keep a backup after server deletion with DeepSave
- Restore a DeepSave or rebuild a deleted server
- Schedule automatic restarts and backups
- Take the full tour of your server dashboard
Looking for your next world? Browse every game we host and spin up a server in minutes.
Need Help?
If you run into any issues, the HardGaming support team is here for you:
- Forum: ask the community and search past answers
- Email: support@hardgaming.tech
- Live Chat: use the chat widget on hardgaming.tech
- Discord: join our community for quick help
Happy gaming! 🎮